Sunday, November 10, 2013

Neapolitan Pizza

pizza margherita

Pizza Napolentana (pizza margherita)

This southern Italian speciality has only five elements, the crust, San Marzano tomatoes, fresh mozzarella, and olive oil.  The crust is quite thin.  The tomatoes are used raw.  Olive oil is used in both the crust and for drizzling atop the finished pizza.


Ingredients:

  • 0.5 tsp yeast
  • 0.75 cup water
  • 2 cup high-protein flour
  • 1 Tb olive oil
  • 1 cup of San Marzano tomato sauce
  • sea salt
  • 8 oz of fresh mozzarella
  • Romano cheese for grating (optional)
mise en place

The Dough:

For two 9 in. crusts do:
Proof the yeast in 0.25 cup of the warm water.  Once proofed, add the yeast, rest of the water and oil to the flour and mix.  Add the salt near the end of the mixing.

Let the dough rise for 2 hours, then separate into 2 balls.  Shape the pizza rounds halfway and let the dough rest 20 mins.

The Sauce:

Mix 1 cup of raw San Marzano tomato sauce with 0.25 tsp of sea salt.

The Cheese:

Slice the mozzarella into thin pieces and divide into two equal piles.
Finished Pizza

The Pizza:

Pre-heat the oven to 490 F (or as high as you dare to put the thermostat).
Pre-heat a stone or cast-iron pan for at least 30 mins.
With the stone or pan ready and hot, take a pizza round and stretch it int 9 in. circle without putting it down.  Place directly onto the hot stone or pan.  Spread 0.5 cup of tomato sauce.  Top with 4 oz of sliced mozzarella.  Bake until crust is golden brown and cheese has melted into the sauce.
Take the pizza out of the oven and transfer to a cutting board.  Top with grated Romano and drizzle with olive oil.
Pizza and Chianti Classico
Wait 5 mins. for cheese to  settle, cut. and serve.

Wine:

A fruity Italian wine would go best, such as a Nero d'Avola.  If you can't / won't do fruity, then stick with a Chianti or a Vino Nobile di Montepulciano.  No French wines!


Sunday, September 29, 2013

Steak With Green Peppercorns

Steak au Poivre Vert

Steak au Poivre Vert

Steaks are chiefly used for romantic endeavours.  Whether this is because steaks are red and red is the colour of love or because steaks are simply good tasting, is unknown.  The basic practice of cooking a steak is to sear each side once and cook the steak no more than medium.  The pan is then deglazed with brandy or whiskey which forms the basis of the sauce.  Serve with asparagus and mashed potato.

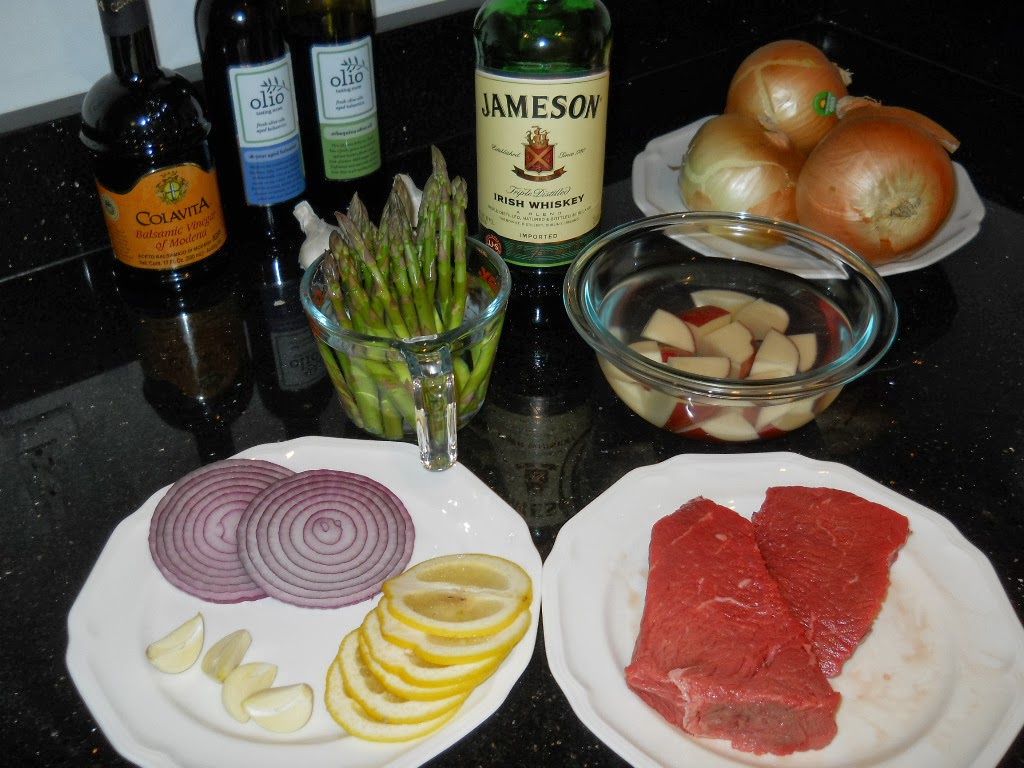
 Mise en Place

  • 2 steaks, about 1/5 to 1/4 lb apiece
  • 4 Tb of butter
  • 2 Tb of olive oil
  • 1/2 lb of asparagus spears
  • 1/2 a red onion
  • 2 cloves of garlic
  • 3 red potatoes
  • 1/4 cup whiskey or brandy
  • 1/4 cup beef stock
  • 1/2 cup heavy cream
  • 1 tsp green peppercorns
  • 1/2 tsp tarragon
Since the cooking time of the steak and sauce is short, it is necessary to have all things in place before beginning the cooking.  Have the potatoes soaking in
cool water.  Have the onions, lemon, and garlic, sliced.  Have the steaks at room temperature and lightly coated with pepper.  The asparagus should be soaking stem-down in cool sugar water for at least an hour.

Potatoes:

Boil water for the potatoes, they will cook for 20 mins.  Set aside 1 T of butter and 1/4 cup of milk for mashing into the potatoes once they are boiled.

 Steaks:

searing steak
Heat a cask iron skilled until the surface just begins to smoke, then turn down the heat to medium or medium low.  Add a pat of butter and lay the steaks down in the middle of the pan.  Use only enough butter to cook with, any extra simply create more smoke and splatter.  Cook until the blood beads on the surface then turn steaks and add more butter if necessary.  Once turned, cook the steaks only for 3-5 mins more.  Remove the
steaks from the pan and cover them in a warm place until ready to plate.

Asparagus:

Heat 2 T of butter and 1 T of olive oil in a skillet until hot.  Add the asparagus and cook until they turn dark green.  Add lemon and a splash of white wine and remove from the heat and cover.  Keep warm until ready to plate.

Onions:

Once the steak is r
emoved, add more butter if necessary and add the onions and garlic quarters.  Blacken the onions on each side and remove from pan with the garlic.

Sauce:

sauce with cream
Once steak, onions, and garlic have been seared in the pan, add 1/4 cup of brandy or whiskey.  Remove the pan from the heat and flame.  Return the pan to heat (obviously once the flames have died) and add 1/4 cup of beef stock.  Bring the liquid to a simmer.  Then add 1 tsp of green peppercorns and 1/2 tsp of tarragon.  Stir in and simmer for a moment.  Add 1/2 cup of heavy cream and gradually stir it in.  Gently bring the sauce back to a simmer.  Stir often. Once the sauce is thickened, start squeezing a lemon slice into the pan and stir constantly.  The lemon will emulsify the sauce if added slowly enough, if added to quickly the cream will curdle.  Once the sauce emulsifies, remove from the heat and begin to plate the dishes.
emulsified sauce

Plating:

Place a steak in the middle of each plate.  Surround with asparagus.  Add the onion rings.  Cover the steak with sauce.  Garnish with lemon and parsley.

Wine:

Drink a strong red, cabernet sauvignon will work.  But for something new, try a nebbiolo d'alba.  It is an Italian wine usually made from 100% nebbiolo graps, the same that go into a Barolo, but much more inexpensive since the region is different.  Most styles spend at least a year on oak and are very enjoyable. Shoot for a wine that is around two years old. (So in 2013, drink a 2011 etc.)  The wine will then have a year on oak to absorb flavour and a year in the bottle to sort the flavours out.  Also, don't buy the bottle of wine the same day you plan on drinking it, buy it the week before, so it is not all shaken up.

 Note on Dining-in:

The ingredients consumed in this meal tally to around $20 of mortal money.  When a moderately priced wine is added, the total for two is around $35.  If the table is set nicely and some inexpensive candles are lit, an entire evening can be had for less than $40 with a dinner for two.  Now considering that the primary reasons for eating a restaurant are either one likes to have candles lit during dinner or one doesn't like doing dishes after dinner, one must think things over.  If one lights a couple 5 cent candles at home, problem solved--a restaurant dinner for $40.  If one absolutely won't do the dishes or clean as they go, then they can save at least $60 by eating at home and cleaning in the morning.  Just some food for thought.
At table
Plated 

Monday, May 27, 2013

Caffè Macchiato

Caffe Macchiato and a Good Read

Caffè Macchiato

Macchiato means "marked" in Italian.  This "marked coffee" is distinguished from plain espresso by being "marked" or "stained" by the milk.  It is usual to have only a little bacio of milk in contrast to the larger milk doses of a latte.

The instructions here are for producing espresso with a "mocha pot" or similar device.  While this lacks the abilities of a machinacaffe, it is rather amazing how close this inexpensive piece of equipment can get.  Keep in mind that mocha pots were the old way of brewing espresso.  What is the difference between the old and new ways?  Well, for starters $550.

The Grind

The grind of the coffee should be finely ground "espresso" grade coffee.  Medium roast coffee works best and the coffee should be ground using a burr grinder.  (If all that is available is a whirling-blades grinder, buy the espresso pre-ground.  Whirling-blades are worse than stale grounds)  If the espresso is already ground, it is helpful to store it in the freezer.

a firm, even tamp
The Tamp

Fill the portafilter just above half-way with the grains and gently tamp with the back of a teaspoon.  The goal is a uniform surface with no air-pockets or stray grains.  The ideal is for the water to pass evenly through the bed of coffee.  If the grains are tamped too hard, the pressure will not be enough to brew the coffee.  If the grains are not tamped hard enough, the coffee will be insipid and no crema will develop.

The Water

Use filtered and room temperature water.  Fill the reservoir to just below the bottom level of the portafilter.  It is important to have this ratio of water to head-space because this determines the initial steam pressure when the water boils.  This steam pressure is the single most important variable in pulling the shot.

Brewing

1
2
3
Once the elements are in place, open the lid of the mocha pot and set the burner to just below high.  The goal is to bring the water to a clean boil as quickly as possible but not bring it to such a rolling boil that it sends steam through the coffee bed.  Steam through the coffee bed will extract bitter coffee tannins and otherwise ruin the shot.  So the ideal is to quickly achieve and maintain a simmer in the reservoir.  Leaving the lid open allows observation of the extraction.
Pulling the perfect shot should look like this:
  1. Sounds of the water heating, no coffee coming from the spout.
  2. Right before a boil is reached, black coffee comes in a stream from the spout.
  3. Shortly after a boil is reached, caramel colored crema comes from the spout and continues until the shot is done.
  4. The final ratio is equal crema and black espresso.  The crema begins to dissipate into the espresso.
3a
4

The Milk

milk heating

poured shot, dissipating crema
Heat the milk in a boiling water bath until it is 160 F.  Any colder and the milk cannot be frothed and any hotter and the proteins will coagulate.(use a thermometer)  Heat a whisk to the same temperature and beat the milk until silky. (about 5 mins)  Pour the milk over the freshly pulled espresso shot.


a finished macchiato
Macchiato

A macchiato should taste something like a piece of 70% cocoa chocolate.  Even though there is no sugar added, the lactose from the milk combines with the cocoa elements of the espresso and the crema to give the illusion of chocolate.  Thus, the "chocolate taste" is the best way to know whether the macchiato is well made or not.  This laurel wreath can take a while to achieve ... we brewed 1.5 lbs of espresso over a period of 4 months until the moment was reached.  It is helpful to change only one variable at a time.  A recommended coffee is LaVazza (la vat za) Espresso Blend.

macchiati(1)
macchiati(2)

Thursday, May 23, 2013

Pain Sur Poolish (Easy Method)

fresh pain sur poolish

Pain Sur Poolish 

A fresh baguette is incomparable.  Here are some tips and a process to ease the accomplishment of this end.  Do not be discouraged at early failure.  Bread making is an art, not a science and, therefore, requires patient devotion.  We are mere neophytes but he wins who waits ...


Nota Bene: the best book on this subject is Joe Ortiz,  The Village Baker: Classic Regional Breads From Europe And North America, Ten Speed Press 2003.  Ortiz' treatment of the art of bread-making is thorough but comprehensible.  He also treats the regional breads of France, Italy, and Germany where he has visited many times.  It is a first-hand account of European breads by a master artisan.


Proofing the yeast:
1. proofing yeast
2. proofed yeast
1) 1/2 cup lukewarm water (105 F, to be precise, err on the side of colder)
2) Sprinkle and float 1 tsp of yeast so it floats
on top of the water.
3) Sprinkle a pinch of sugar over the yeast.
4) Wait until the mixture is  bubbly (10-15 mins)

Mixing the poolish:
1. mixed poolish
1) Place 1 cup of flour in a bowl and make a fountain.(low gluten flour)


2) Pour the proofed yeast into the fountain.


3) Rinse the yeast cup with 1/2 cup of lukewarm water (100 F)

2. poolish rising

4) Mix thoroughly and scrape down sides.  (resulting mixture is 50/50 water and flour.)

5) Place in a cool oven alongside a bowl of boiling hot water. (Oven temperature should be between 90-100 F)


3. fallen poolish
6) Wait around 4 hrs until it rises to twice its volume and falls. (Yeast will have consumed most of the available sugars in the poolish and will have multiplied substantially.)


Mixing the dough:
mixed dough
1) Place 2 cups of flour (high gluten) in a bowl and make a fountain add a pinch of sea salt.

2) Add 1/4 cup of water to poolish.

3) Add poolish to the fountain.


proofing dough
4) Mix until very elastic and no longer sticky. (you are developing the gluten by kneading)


5) Let dough rest for 10 mins.  This is a "gluten rest" and will give time for gluten to form.


6) Resume vigorous kneading until dough is stiff and (hopefully) satin smooth.
risen dough


 7) Turn into an oiled bowl.(1)


8) Let dough rise at room temperature until almost doubled in size.


Making the baguettes:
loaves
1) Preheat oven to 425 F.
2) Separate dough into two halves.
3) Fold in on itself until very taut and let rest 5 mins.
4) Form into loaves by folding only in one direction, keeping the tension, let rest 5 mins
6) Stretch into baguettes and place in or on a pan depending on the pan.
7) Slice thrice (cuts should be angled at 30 degrees, this is important to let the loaves bloom evenly in the oven and it will let the wee folk out)
stretched loaves
8) Let proof until dough no longer springs readily back when poked (It will spring back slightly, that is good.)
9) Toss a 1/4 cup of water in the bottom of the oven (not on glass door, not of the glass lights, they will break)
10) Put baguettes into the oven and bake for 10 mins.
11) Rotate pan and bake for 10mins
12) Rotate pan and finish baking (probably another 10 mins)

Testing done-ness:
1) Baguettes should be a golden to dark brown all over.
2) Should sound hollow when rapped.
3) Should start to crackle when taken out of the oven for 2 mins
(in fact, the crackle is the sign of a good loaf.)
Eating:
1) Baguette should be cooled to warm before cutting
2) Baguette should be eaten within 4 hrs
3) In the unlikely event that is it not eaten within 4 hrs, split baguette in twain and rub each half with olive oil and garlic, bake in a 350 F oven for 20 mins wrapped in foil
4) In the very unlikely even that it is not eaten within 24 hrs, cube baguette and sautee with olive oil and garlic until crisp croûtons are achieved.
-----------------
1. Due to some feedback from users, it seems necessary to mention that the bowl be merely lightly oiled, despite the goodness of olive oil--save whatever oil one may want to put into the bowl to dip the finished bread into later.

pizza
The dough for one baguette can also be used to make one 16" pizza.  Just stretch out the ball into a circle instead of making it into a loaf.  Do not roll it with a rolling pin as this will remove all air from the dough and result in a non-fluffy and non-wonderful crust.

Bake on the bottom rack of a 470 F oven until dark brown crust and cheese is achieved. Do not use lots of tomato sauce or it will prevent the centre crust from cooking.

Tuesday, April 2, 2013

Carre d' Agneau Persille


Parsley Rack of Lamb

Carre d' Agneau Persille


Simple preparation for rack of lamb, broiled then baked with an herb crust.


Use the least fatty rack you can find.  It is crucial not to overcook the rack.  The lamb will continue to cook when it is removed from the oven; so if a higher level of done-ness is required,  cook for the prescribed time and then let the lamb sit for 10-15 min before cutting and serving.  Cooking time 30 min, serves 2.

Ingredients: 

  • 1 rack of lamb
  • 1 shallot
  • 1 large clove of garlic
  • 1/4 cup of minced parsley (no, dried parsley will not work)
  • 1/4 cup of bread crumbs
  •  4 tablespoons of butter
  • olive oil
  • salt
  • pepper

Steps:

1. rib-side buttered
1. Preheat oven to 500 F.  Let lamb warm a bit to room temperature.  Lightly pepper and salt it on both sides.  Set the rib side up and dot each rib-end with butter.

2. herb mixture
2. Mince the shallot, garlic, and  parsley.  Blend them with the breadcrumbs and use olive oil to bind the mixture (about 2 tablespoons).
3. Once oven is at 500 F.  Turn off oven and set broiler to 500 F.  Wait 2 min and then add the rack close to the broiler.  Broil for 2 min rib-side up and then turn and boil for 3 min meat-side up.  Remove from oven, turn off the broiler, re-set oven to 500 F.
4. herbed rack
4. Meat-side up, cover the rack with the herb mixture and make a nice crust.  Do not cover the rib side.  Then dot the herbed rack with butter and return to the 500 F oven.
5. Bake in the 500 F oven for 10 min.  Remove.  Do not bake longer than this as the rack will be ruined.  (I.e. there will be rack and ruin)  If a more well-done meat is desired, let the rack sit for 10-15 min more before cutting. (wrap in tin foil, for well-well-done).
6. Slice the ribs and serve.  When slicing, it should be possible to finesse around the rib-joint bones without having to slice right through them.  If the rib is having trouble releasing, try wiggling it around a bit and cutting everything save the bone.  Serve with rice and grilled tomatoes.

Parsley Rack of Lamb
Serve with a hearty red wine.  A tannic Cabernet, or some of the Spanish reds, a Grenache.  Pinot Noir might work.

Friday, March 15, 2013

G & T

Gin and Tonic

A staple drink, especially for those who do not want Martinis.  While the traditional gin and tonic has only lime juice, the house version omits the lime juice and instead uses zest of lemon and zest of lime.

Tanqueray London Dry Gin

After extensive testing of other gins, we have determined that the only gin that really shines in a gin and tonic is Tanqueray London Dry Gin. (not Tanqueray Rangpur nor Tanqueray 10).  Tanqueray LD is made with four botanicals only: Juniper, Coriander, Angelica, and Liquorice.  Compare this with Bombay Sapphire, which has ten botanicals.  Accordingly Tanqueray LD has a very firm, full flavor which holds up to the tonic water without tasting merely like ethanol (which is what happens to Bombay Sapphire).

Ingredients:  

  • 1 oz Tanqueray London Dry Gin
  • 5 oz Canada Dry Tonic Water (kept in 10oz glass bottles)
  • lemon zest
  • lime zest
  • ice
  • highball glass (not chilled)

The Recipe:

  1. Place 4-5 hard, fresh ice cubes in the highball glass
  2. Over the glass zest the lemon and lime, ensuring the mist of the zesting process lands in the glass.  This is a crucial step which allows the citrus oils to form the aroma of the drink when combined with the tonic water.  Leave the finished zests on the ice.
  3. Pour the gin over the ice and citrus zest.
  4. Top off with chilled tonic water (again, about 5 oz)
  5. Serve immediately.

Enjoying: 

  • Smell the drink first.  Try to isolate the lemon, the lime and then the juniper.
  • The juniper is the principle flavor, though not the strongest.  It is reminiscent of pine trees and firs and Christmas.
  • When sipping, let the drink flow over the whole tongue, do not swallow right away.  Let the carbon dioxide from the tonic water wake your taste buds and then try to taste the different botanicals.
  • Juniper: pine, resin, fresh green flavor, citrus
  • Coriander:  orange, lemon, spice, nutty, pine
  • Angelica: a very particular flavor rather between fennel, anise, and caraway.
  • Liquorice: sweet, anise, tarragon, and sassafras (somewhat like root beer flavor).  The liquorice flavor does not appear until the end of the sip.
  • Quinine: bitter
  • Remember, drinks are meant to be savored and thought over.  Give them at least as much consideration as you give your iphone (like turn your iphone off and enjoy a drink) and they will reward you ten-fold.

Tuesday, March 12, 2013

French 75 aromatique

French 75

French 75 aromatique

The usual, but given some more herbal notes by infusing the simple syrup with green aromatics.

Ingredients:

  • 0.5 oz  simple syrup (infused, see below)
  • 0.5 oz London Dry Gin (Tanqueray )
  • 2 oz Sparkling Wine
  • lemon twist


 Simple Infused Syrup

Combine 0.5 c water and 0.5 c white sugar in a sauce pan and bring to a boil with the lid on.  Boil for 2 min. and then remove from the heat.
Add around 2 tablespoons of greens, one of the following:
  • Celery leaves
  • Italian Parsley leaves
  • Lemon Basil leaves (use sparingly)
  • 2 Juniper berries (would supplement the Christmas tree flavor of the gin.  Tanqueray is rather weak Juniper flavor so it would pair nicely)
  • 1 Star Anise pod (only around Easter or Christmas)
Let the syrup cool with the herb and then strain and chill.

  Assembly:

  1. In a chilled Martini glass or Champagne flute, put the syrup and gin.
  2. Top with sparkling wine and garnish with lemon twist.

Swordfish Arreganata

Swordfish with Breadcrumbs

Spada Arreganata

Swordfish steak baked then pan seared with breadcrumbs and served over sautéed vegetables.
 
Il pesce spada (swordfish) is a large oily fish with hearty steaks.  The zoological name is, as usual, much preferable -- Xiphias gladius.   "Arreganata" indicates preparation with bread crumbs.  This preparation pairs the richness of the fish with the sweetness of the vegetables and binds them with lemon.  It is important to cook the tomatoes and onions long enough and cook the spinach short enough.  The onions must develop some char and the tomatoes should be completely cooked.  The spinach should only be limp.
Cooking time 45 min. Serves two.

Ingredients:

  • 2 swordfish steaks (sushimi grade frozen steaks wild caught in the Atlantic are best.  Do not eat mercurial fish caught in Singapore.)
  • 2 tomatoes
  • 1 white onion (do not use a sweet onion)
  • 2 cups of fresh baby spinach
  • 1/2 cup of bread crumbs (not the salt-ridden stale stuff, it will mask the other flavors.  Make it yourself if necessary(1))
  • 2 garlic cloves
  • 2 lemons
  • 2 T of butter
  • paprika
  • pepper
  • salt
  • olive oil

 Steps:

1. Rub the defrosted swordfish steaks (do not defrost them in the microwave, that is bad ju ju) with paprika and salt and pepper.  Preheat oven to 450 F.
2. While oven is preheating, slice the onion into six round slices and slice each tomato into four slices.  Peel and slice the garlic.
3. Put steaks in a pyrex casserole dish (if you cook it in a tin pan, it is on your own head).  Squeeze a half of a lemon over each one and put some water in the pan.  Top each steak with a tablespoon of butter and put into the oven for 18 mins.
4. Whilst swordfish is cooking put some olive oil in a cast iron skillet and heat to shimmering.  Heat some oil in a non-stick skilled and cook the garlic until aromatic.
5. In the garlic pan wilt the spinach.  In the cast iron pan sear the onions until black on both sides.  Then sear the tomatoes hard on one side and then briefly cook other side (the tomatoes will be very limp, try to keep them together).
6. Layer the vegetables in three stripes (do not make an Italian flag, that is tacky and stupid).
7. Take swordfish and dredge each side in breadcrumbs.  Put more olive oil in the cast iron pan and sear the breaded swordfish until breadcrumbs are toasted.
8. Place steaks on vegetable bed and squeeze another half a lemon over each dish.  Garnish with lemon twist and serve.

This is a surprisingly filling dish so side dishes are probably unnecessary.  A California style Chardonnay would pair well with the richness of the fish.  Alternatively a light red wine such as Pinot Noir would supplement the vegetables nicely.  A Cabernet would be uncalled for.

------------
1. Toast two slices of French bread.  Cut into cubes and either beat to a powder or (for those who have food processors with metal blades, you know who you are) whirl in a food processor.